Sunday, January 19, 2014

Weekly Menu Using My Meal Planning

I figured since I posted a "how-to" the other day, I'd show you how I stretch my dollars this week.  Remember I said I was on a very tight budget right now?  Well, when I said tight, I mean tight.  My weekly food budget is $30.  Yup, you read that right.   I feed myself & Hubs breakfast, lunch, dinner and snacks on a mere $30 a week.  That averages to $1.42 per meal. 

Remember, I have a stocked pantry & freezer so I always start there. 

I had eggplant parmesan, hot dogs, hot dog buns, chili, onions, pizza sauce, pizza dough makings (flour/salt/yeast), pinto beans, rice, tomatoes, corn tortillas, baked potatoes along with various fresh, canned or frozen veggies & fruits. 

I used that as the start of my menu planning and filled in what was on sale at the local stores.  Again, Aldi's prices couldn't be beat. They had pork on sale but whole chicken was still cheaper so I got that instead and re-vamped my menu.

This week, I spent $29.68.  If I have money leftover,  I will either save it to add to next week's budget or I will buy extra things I normally use that are sale.

This is why looking at your weekly sales flyers is very important.  Homeland often offers pantry staples like ketchup, BBQ sauce, pasta, etc. at 10/$10.00.  You don't have to buy 10 so I can pick up one or two and stash them.  That is how to build your pantry. 
 
Dinner Menu
Saturday:  Eggplant parmesan sandwiches, French Fries
Sunday:   Roast Chicken, potatoes, carrots, onions, salad
Monday:  Breakfast for Dinner: Waffles, Sausage & fruit (Pot luck at work. Baking cookies)
Tuesday:  Daddy Date Night (aka Lisa's on her own)
Wednesday:  Chicken Enchiladas, rice, refried beans
Thursday:   Pizza  with black olives/onions/peppers & salad
Friday:  Chicken-n-Noodles

I always add some sort of veggie or fruit to my meals.  Lunches are leftovers.

Tuesday, January 14, 2014

A New Opportunity!

Today, I start a new job.  I'll be a Medical Instructor at a local technical college!  WOOT!  Yes, back to my beloved teaching.

I cannot tell you how excited and happy I am to have this new opportunity.  It's been a long three years since I last taught.  I've gone through a few jobs and never found my niche.  THIS is my niche!

Stay tuned for more recipes, garden updates and news.

Thank you to everyone who has been reading my little blog.  I'm always very surprised and thankful to see the activity.  I appreciate each and every one of you! :)

Monday, January 13, 2014

How to Stretch Grocery Money with Menu Planning

As I've said before, I hate wasting food.  Tossing leftovers is just throwing money in the trash.  I don't know about you, but I cannot afford to do that.  My budget is pretty strict right now so it's even more important that I plan & shop wisely.

Here are a few things I do to stretch those dollars.

The most important thing you can do to save money is menu planning.  Yes, yes, I know.  It takes a little time but I promise, it will soon become second nature and you'll be amazed at how much money you save.

The first step in my weekly menu planning is to go shopping in my own pantry and freezer.  It's kind of fun to use up those weird items you bought and then never used.  You'll be amazed what is actually in there. Got chickpeas?  Try making hummus or falafel.  Both are easy, delicious and very nutritious. I had farro, which is a type of wheat, so I'm using it to make a delicious pilaf instead of rice. Be creative. Think outside your normal recipes and try something new.

I then shop the sales flyers and flesh out menus according to what's on sale that week. Yes, I go to a few different stores but they are all very close so I'm not wasting gas.

 I also price check against Aldi.  They are usually cheaper than most but you have to make sure.  Sometimes, the sales are less expensive.  They are also starting to carry organic produce and pantry items so I am very excited!  Just remember, they accept only cash and debit cards.  And don't forget your bags!  You have to bag things yourself.  If you happen to forget, they do sell bags.   

One weird place I go is Dollar Tree.  Yes, they have a lot of crap food there but sometimes, you can hit the jackpot.  I found organic butter, organic frozen spinach, & organic frozen berries for a buck each!  Yes. One pound of organic butter for one dollar!  Amazing!  They sometimes have organic pantry items as well.  I go often. 

Once you see what's on sale, it's time to plan for the week.  Plan all meals for the week and weekend.  This is where you can really be creative and save as well by planning for leftovers.  Here is a good example. 

I buy whole chickens.  They are on sale a lot and always cheaper than buying pieces.  From one chicken, I get at least three meals.  I bake or Crockpot broast it for a delicious meal of chicken, a starch side and a veggie.  Next meal can be chicken enchiladas, chicken pot pie, or chicken pinwheels.  Then, I take the carcass and put it back into the Crockpot, add some celery, onion, carrots, seasoning and water and make delicious chicken broth.  This, plus the leftover chicken meat, can be made into various chicken soups (chicken noodle soup, chicken rice soup, etc.), chicken and dumplings, or chicken and noodles. 

Beef roast on sale?  How about traditional Yankee Pot Roast with potatoes, carrots, and onions.  Leftover can make pot pies, stew, BBQ beef sandwiches, beef and noodles, and yes, vegetable beef soup. 

If you change up the meats enough, you won't get bored with the meat because it's so different than previous meals.  If you don't want to eat 3 meals in on week, you can always freeze the meat and use it again the next week.  Either way will save you a ton of money.

If you happen to have a little extra cash, buy extra items your family eats when they are one sale.  Like my $1 butter.  I bought 5 of them and in the freezer they went.  Just make sure to check expiration dates. 

You probably noticed I didn't mention coupons.  Too be honest, I don't use them very often.  I very seldom buy national brands and if I do, it's because they are on sale.  I've found that even with a coupon, local brands are usually cheaper.   I will clip a few though.  Hubs loves Pop Tarts (ick!) so I keep those handy.  I also clip any for organic foods.  If you pay attention, you can use the coupons when things are on sale and save even more green!

So there you have it.  Easy ways to save some serious cash.  I typically spend less than budgeted and I put what I saved aside.  At the end of the month, I usually have enough saved for a nice meal out.  I love to cook but sometimes, it's nice to let someone else handle things. 

Friday, January 10, 2014

Spring Has Sprung-NOT!

OK, so that's not really true.  It's still winter and we've got a few more months until Spring is really here.  But THIS came today, so now I have Spring Fever!
Yes, I'm dreaming of my beautiful garden, filled with delicious & healthy veggies, fruits, & herbs.  I've got a lot of work to do. 
 Picture Source: Imgur
My plan is to convert 1/3 of my backyard to food production.  This year, I'll be establishing my basic raised beds.  I'm going for sometime like the picture above.  I love how neat & tidy it looks.  I've got several to build and fill but I'm up to the task.  Oklahoma soil isn't the greatest so raised beds are the best option.  Besides, they are beautiful to look at and help retain more moisture.  And believe me, in the middle of summer when the temps stay at 100+ for weeks on end, moisture retention is pretty darn important. 

There will be two herb garden boxes.  One will be culinary and the other medicinal. I plan on taking out some decorative tress that never have been very decorative and replacing them with fruit trees.  I have four spots so two will be fig tress.  I love figs so they are a must.  I haven't quite decided what the other two spots will be yet.  There will also be a spot for strawberries and I'm looking at planting blueberries.  This may wait until next year.
I'll be trying my hand a seasonal rotation and I want to build a couple cold frames to extend my garden as long as possible.  This looks exactly like what I have in mind.  I have an ideal South facing brick wall so this is perfect. Our early winters are pretty mild most years so I think I'll have some luck with cold-hearty plants like kale and Swiss chard. 
http://www.agardenforthehouse.com/
 And of course, there will be a place for zinnias.  They are just too perky to not plant!  They add a needed splash of color to an otherwise all green palate.  Beautiful!

So there you have it.  My garden plan for this year. 

Tuesday, January 7, 2014

Soft & Delicious White Bread

OK, my normal go-to for homemade bread is usually whole wheat based.  So what's a girl to do when she's out of whole wheat flour but needs some bread?  Well, I'll tell you what.  Use what you have and make white bread.

I know, I know.  White bread has a bad rap.  I feel OK about this one because I know every single ingredient in it and there are no preservatives or chemicals to gunk it up.  Just simple, real ingredients.  If you have organic ingredients, use that.  If not, making bread from scratch is still leaps and bounds above store-bought bread.  And if you have picky eaters, at least you know this bread is wholesome and healthy. 

This recipe delivered!  The bread was pillow soft and delicious.  It will definitely be a go-to for those times when wheat bread just isn't called for.  Sometimes you just want 'light bread' for things like old fashioned tuna salad or grilled cheese sandwiches.  As much as I love my whole wheat breads, it just doesn't work for some things. 
Soft White Bread
1 cup hot Water                                             
2 teaspoons Yeast (this is one 1/4 oz. package)                               
3 tablespoons Sugar                                       
1/4 cup Vegetable Oil
1 teaspoon Salt                                             
3 cups White Flour                                
1.  Pour hot water into bread maker and add sugar.  Stir until sugar melts. 
2.  Evenly sprinkle with yeast.
3.  Let sit until yeast blooms and is foamy, about 10 minutes.
4  Pour in oil, salt and flour. DO NOT MIX!
5. Set to 1.5 lb. loaf and basic white cycle and bake.
This is what you end up with.
And if you're me, this is what you end up with!


Monday, January 6, 2014

Friday, January 3, 2014

Homemade Dish Soap

This morning, I ran out of dish soap.  I tried one homemade recipe and it was a bust.  But, since one of my New Year resolutions was to be healthier, I thought I'd give it another try.  I scoured (pun intended) the Web and found this recipe.  I read all the reviews and everyone seemed to be pleased with the results, so I figured, why not?  I had all the ingredients on hand. 

The recipe did say that the soap will thicken as it cools.  If it gets too thick, add a bit of warm water and shake it to get to the consistency you desire.

So, how does it work?  I washed a plate and a greasy plastic container.  Both were clean.  The soap had some suds, wasn't slippery, and got both clean.  Next time, I think I will decreased the tea tree oil or do something citrus.  After it sat all day, it because very thick, as in a big glob, so, I added hot water, got out a chopstick and mixed it. Definitely added more to the bottle than shown.  Worked great.  All in all, I'd call this a win. 
Homemade DishSoap
1-1/4 cups boiling Water
1/4 cup tightly packed Bar Soap, grated (I used Octogon)
1 tablespoon Washing Soda
1/4 cup liquid Castile Soap
10-30 drops essential oils (optional. I used 15 drops tea tree because I love the clean smell)
Add grated soap to boiling water and stir until dissolved. 
Just add little bits at a time; otherwise, you'll end up with a huge soap ball and it will take forever to dissolve.  Yes, I'm speaking from experience.
Add washing soda to melted soap and stir.
Add liquid castile soap and stir.
Stir occasionally. As it cools, it separates ever so slightly.
Let cool and then add oils if using.
Decant into old dishsoap bottle or do like I did and put it in a pretty bottle.  Who says dishsoap can't go into cut glass anyway? 
Doesn't this look pretty?

Wednesday, January 1, 2014

Spicy Chicken Pinwheels

I found myself with leftover chicken yet again.  I wasn't in the mood for Mexican and I didn't just want sliced chicken with some veggies.  I craved flavor.  I also had to make pizza sauce.  It tastes better if it can mellow for a day or two.  I started puttering around in the pantry and this is what I came up with.

Hubs ate three pinwheels and requested one for his lunch tomorrow.  I'd call that a winner!  We both decided that the filling would make an excellent filling for ravioli too.
Missing: One large egg!

Spicy Chicken Pinwheels
Makes 6 Pinwheels
2 cups Pizza Sauce (+ extra to serve if you like things saucy)
1 tablespoon Sugar
6 Lasagna Noodles, cooked and cooled (make a few extra to account for some that will rip)
Chicken Filling*
~2 cups cooked Chicken, shredded
~3 Garlic Cloves, minced
~1/2 teaspoon crushed Fennel or Anise seed
~1/2 teaspoon dried Basil
~1/2 teaspoon dried Oregano
1/ teaspoon crushed Red Pepper
~1/3 cup chopped Black Olives
~1/3 cup chopped canned Mushrooms
4 ounces Mozzarella Cheese, grated
3 ounces  Parmesan Cheese, grated fine (+ extra to sprinkle)
1 large Egg

 
Cook lasagna noodles in salted water as directed by package.
Drain, rinse with cold water, and set aside.
To make filling, shred chicken.
Add all seasonings.  Mix well.
Add black olives and mushroom and again, mix well.
Add both cheeses and egg.
Mix together completely with your hands.  Don't be scared.  Get in there! Mixture should have no big chunks of chicken and hold together lightly.
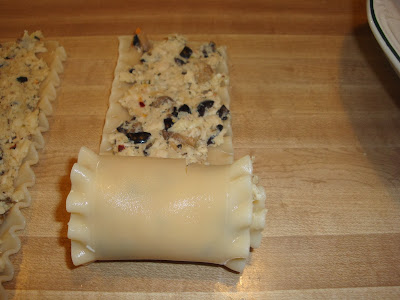
Lay out lasagna noodles and distribute mixture evenly.
Spread mixture evenly over noodles, trying to keep it about the same depth over whole noodle.
Roll from short end.  Don't worry if some of the ends are a bit ragged.  Just make sure to put that end on the inside.
Spray baking dish with cooking spray & put about 3-4 tablespoon sauce in bottom to coat.
Lay noodle rolls in pan.
Cover with sauce, making sure it gets in between rolls.
Bake at 350 degree F for 30 minutes.
Take out and sprinkle with more shredded Parmesan then return to oven.
Continue to bake until sauce is bubbly and cheese is browned, about 20-30 minutes.  Isn't my new baking dish adorable?  Thank you, Charlotte, for the new Winterberry addition!
Serve with extra grated Parmesan and extra sauce if desired.