
Monday, December 30, 2013
Glad Jule Everyone!
I'm a little late but hey, it's still Yule for me! Here's hoping your Yuletide has been a fantastic one.

Life with Trees
Our little piece of this beautiful Earth is blessed with an abundance of Oak trees. I counted and there are 30 of them. Yes, you read that right, 30! In Spring, seeing their buds reminds us that warmer weather is close at hand, and in Winter, their skeletal beauty highlights the contrasts of the season. In Summer, they provide much needed shade. In Fall, they provide the squirrels with an abundance of acorns & us with natural mulch.
Unfortunately, Spring brings serious pollen. It covers everything in a nice sprightly lime green. Summer brings a ton of pesky, noisy Grackles, Falls leaves are prolific and seem to naturally gravitate towards the swimming pool, and Winter, well, this is what happens in Winter. A limb feel on our neighbor's fence too.
 As I was typing, the insurance adjuster dropped by. From what he can tell, there is no roof damage but the gutter guard was bent and possibly the gutter as well. The tree is still there so he wants to come back once it's completely removed. Then we will see if the roof is still OK.
~Sigh~ Yes, life with trees.
Unfortunately, Spring brings serious pollen. It covers everything in a nice sprightly lime green. Summer brings a ton of pesky, noisy Grackles, Falls leaves are prolific and seem to naturally gravitate towards the swimming pool, and Winter, well, this is what happens in Winter. A limb feel on our neighbor's fence too.

~Sigh~ Yes, life with trees.
Crockpot Split Pea Soup for a Wintery Day
We've been enjoying some nice weather this week. Yesterday, it was almost 60 degrees and sunny. Absolutely beautiful day. Last night, things took a turn. Around midnight, the wind started howling, the trees were swaying and whoosh! Here comes Winter! Today, it's around 25 degrees. Perfect for soup.
I've been hording a gigantic ham bone since Yule and it's now in the crockpot, along with some carrots, potatoes, and green split peas. YUM! Don't let the simplicity of this recipe fool you. This soup is filling, inexpensive (a 1 pound bag of split peas in OKC was only $1.49), uses up those leftovers and is absolutely delicious! Can't beat that!
I did not add salt to the soup as the ham gave it just the right amount of seasoning. If you need more, wait until soup is finished then salt to your preferences. Salt can cause beans/peas to remain hard and we definitely do not want that!
The biggest question when it comes to Split Pea Soup is: Chunky or pureed? I let my sweet Hubs dictate this decision as I like it both ways. His choice? Pureed.
 Crockpot Split Pea Soup
1 16-oz bag Green Split Peas (If they have yellow split peas, they are delish too)
1 meaty Ham Bone (If you don't have a bone, use some ham hocks or chopped up ham)
1/2 bag Baby Carrots
1/2 very large Onion, chopped (1 medium)
1 large Potato, cubed
2 Celery Stalks, chopped
3 Garlic Cloves
2 Bay Leaves
1 tablespoon fresh ground Pepper
6 to 7 cups Water
 Wash and sort peas & put in Crockpot.
 Add carrots, onion, potato, celery, garlic, bay, and pepper.
 Stir to mix.
 Lay ham bone on top and push it down into the mixture.
 Add water. Make sure it's just enough to cover the bone and pea mixture.
 Set on HIGH and cook until peas, carrots, and potatoes are soft.
 Take out ham bone and big ham chunks and set aside.
You can leave it chunky or if you prefer, you can puree it together for a smoother texture. Be careful with the hand mixer. Make sure to keep the head completely submerged; otherwise, you'll have pea soup splatters everywhere!
 Separate ham into small pieces and stir back into soup once it's pureed.
 Dish up a serving and enjoy! You can sprinkle some crispy bacon or shredded cheese on top if you like. We were hungry so we just dug in.
 Had to show off the top of the bread, fresh from the bread maker. Yummmm!
Serve with some fresh Honey Oatmeal Bread and butter, or as I did, honey butter. Divine!
I've been hording a gigantic ham bone since Yule and it's now in the crockpot, along with some carrots, potatoes, and green split peas. YUM! Don't let the simplicity of this recipe fool you. This soup is filling, inexpensive (a 1 pound bag of split peas in OKC was only $1.49), uses up those leftovers and is absolutely delicious! Can't beat that!
I did not add salt to the soup as the ham gave it just the right amount of seasoning. If you need more, wait until soup is finished then salt to your preferences. Salt can cause beans/peas to remain hard and we definitely do not want that!
The biggest question when it comes to Split Pea Soup is: Chunky or pureed? I let my sweet Hubs dictate this decision as I like it both ways. His choice? Pureed.

1 16-oz bag Green Split Peas (If they have yellow split peas, they are delish too)
1 meaty Ham Bone (If you don't have a bone, use some ham hocks or chopped up ham)
1/2 bag Baby Carrots
1/2 very large Onion, chopped (1 medium)
1 large Potato, cubed
2 Celery Stalks, chopped
3 Garlic Cloves
2 Bay Leaves
1 tablespoon fresh ground Pepper
6 to 7 cups Water


You can leave it chunky or if you prefer, you can puree it together for a smoother texture. Be careful with the hand mixer. Make sure to keep the head completely submerged; otherwise, you'll have pea soup splatters everywhere!


Serve with some fresh Honey Oatmeal Bread and butter, or as I did, honey butter. Divine!
Sunday, December 29, 2013
Cooking for Yuletide-Part Three: Cranberry Lemon Crumble Bars
Yup, more dessert for Yule! For me, you cannot have Yuletide without something red and cranberry. I LOVE cranberries. Seriously, I really do. I eat cranberry sauce all year long.
I horde fresh cranberries Thanksgiving through Christmas and stash them in my freezer to use through the rest of the year. Yeah, I love cranberries.
So I was crusin' the ole Internet, seeking a pretty recipe to finish off my trifecta of Yuletide desserts. I looked at cranberry cakes, cranberry breads, cranberry tarts, even some cranberry candy but I finally found a recipe I thought would be delicious. Cranberry Crumble Bars.
A quick look in the pantry and I was good to go. I got the pan ready, all my ingredients out and UHOH! What I thought was Golden Butter cake mix turned out to be Lemon cake mix! Shoot! Then I thought, well, why not give it a try. I like lemon and I love cranberries so why not? If it didn't taste good, I could always toss it.
Trust me, this was a good mistake. The scent wafting out of the oven was divine and OMG! These things are G-O-O-D! Everyone ate them up. Next time I make them (oh yes, there will definitely be a next time) I think I will make a vanilla glaze to drizzle.
I apologize. Somewhere along the way, the pictures of how to make these were lost. Just follow the directions and you'll end up with these lovely gems!
 Cranberry Lemon Crumble Bars
(Adapted from allrecipes.com)
1 12oz package fresh cranberries
1 cup White Sugar
3/4 cup Water
I horde fresh cranberries Thanksgiving through Christmas and stash them in my freezer to use through the rest of the year. Yeah, I love cranberries.
So I was crusin' the ole Internet, seeking a pretty recipe to finish off my trifecta of Yuletide desserts. I looked at cranberry cakes, cranberry breads, cranberry tarts, even some cranberry candy but I finally found a recipe I thought would be delicious. Cranberry Crumble Bars.
A quick look in the pantry and I was good to go. I got the pan ready, all my ingredients out and UHOH! What I thought was Golden Butter cake mix turned out to be Lemon cake mix! Shoot! Then I thought, well, why not give it a try. I like lemon and I love cranberries so why not? If it didn't taste good, I could always toss it.
Trust me, this was a good mistake. The scent wafting out of the oven was divine and OMG! These things are G-O-O-D! Everyone ate them up. Next time I make them (oh yes, there will definitely be a next time) I think I will make a vanilla glaze to drizzle.
I apologize. Somewhere along the way, the pictures of how to make these were lost. Just follow the directions and you'll end up with these lovely gems!

(Adapted from allrecipes.com)
1 12oz package fresh cranberries
1 cup White Sugar
3/4 cup Water
1 box Lemon Cake Mix
3/4 cup Butter, melted
2 Eggs
1 cup regular Oats
3/4 Brown Sugar, packed
1 teaspoon ground Cinnamon
Wash and pick out any soft or bad cranberries.
Mix cranberries, white sugar and water in a saucepan.
Cook over medium heat, stirring occasionally, until all cranberries pop.
Simmer for 15 minutes until mixture is thickened and cranberries are soft.
Set aside.
Heat oven to 350 degrees Fahrenheit.
Mix together Lemon cake mix, butter, and eggs.
Stir in oats, brown sugar and cinnamon.
Set aside 1-1/2 cups of mixture.
In an 9x13 pan, press rest of mixture to form a solid crust, trying to keep it the same thickness.
Spread cooled cranberries over crust.
Pinch off pieces of the remaining mixture evenly over the top. I did this by dividing the pan into halves, then fourths, then eights, then sixteenths to make sure it was nice and even.


Bake for 35 to 40 minutes until top is lightly browned.


Cool before you cut into pieces, otherwise the crust will tear.


Cooking for Yuletide-Part Two: Soft Sugar Cookie Cutouts
So I spent some serious time making a lot of cookies. Sugar cookies to be exact. I saw a recipe that looked so good I had to give it a go.
Now to be honest, I'm not big on sugar cookies. Most are too hard for my preferences. This recipe, however, claimed to be soft. The problems I've had in the past with soft sugar cookies is that they don't retain their shape very well. It's fine if you're just cutting out circles but I had something a bit more Yule-ish in mind.
I got some wonderful Yule cookie cutters from Hemslojd, a sweet little import shop in Little Sweden, USA aka Lindsborg, KS., a few years ago. In Swedish tradition, there was a Dala horse, a Julebuck, a pig, and a heart. So as you can see, I needed a recipe that would really hold up when baked.
The good news is this recipe is perfect. The cookies are tender yet firm and the shapes stayed exactly as they should. The most difficult part was the amount of time it took to make, chill, roll, cut, bake and decorate. Yeah, it was an effort but Yum! They are beautiful to look and delicious too.
This is where I got the recipe. Obviously it's difficult to tell you how many it will make. It all depends on the size of your cookie cutters. I ended up with quite a few, probably about 4 dozen.
 Soft Sugar Cookie Cut Outs
adapted from Taste of Home
2 cups unsalted butter, softened
1 (8 oz.) package cream cheese, softened
2 cups sugar
2 egg yolks
1-1/2 teaspoon vanilla extract
4-1/2 cups all-purpose flour
Buttercream Frosting:
3-1/2 cups confectioners' sugar, divided
4 tablespoons butter, softened
1/2 teaspoon vanilla extract
3 to 4 tablespoons milk, divided
food coloring, optional
 In the bowl of an electric mixer, cream butter and cream cheese until light and fluffy.
 Add sugar, egg yolks and vanilla; mix well.
 Gradually add flour.
 Cover and chill 2 hours or until firm.
 Roll out on a floured surface to 1/4-inch thickness.
 Cut into 3-inch shapes.
 Place 1 inch apart on parchment (or foil) lined baking sheets.
 Bake at 350 for 10-12 minutes or until set (not browned). Cool 5 minutes; remove to wire racks to cool.
Sorry, I forgot to take a pictures of the steps for the frosting.
For frosting, combine 1-1/2 cups sugar, butter, vanilla and 3 tablespoons milk in the bowl of an electric mixer; beat until smooth. Gradually add remaining sugar; beat until light and fluffy, about 3 minutes. Add enough remaining milk and food coloring (if using) until frosting reaches desired consistency. Frost and decorate cookies.


Now to be honest, I'm not big on sugar cookies. Most are too hard for my preferences. This recipe, however, claimed to be soft. The problems I've had in the past with soft sugar cookies is that they don't retain their shape very well. It's fine if you're just cutting out circles but I had something a bit more Yule-ish in mind.
I got some wonderful Yule cookie cutters from Hemslojd, a sweet little import shop in Little Sweden, USA aka Lindsborg, KS., a few years ago. In Swedish tradition, there was a Dala horse, a Julebuck, a pig, and a heart. So as you can see, I needed a recipe that would really hold up when baked.
The good news is this recipe is perfect. The cookies are tender yet firm and the shapes stayed exactly as they should. The most difficult part was the amount of time it took to make, chill, roll, cut, bake and decorate. Yeah, it was an effort but Yum! They are beautiful to look and delicious too.
This is where I got the recipe. Obviously it's difficult to tell you how many it will make. It all depends on the size of your cookie cutters. I ended up with quite a few, probably about 4 dozen.

adapted from Taste of Home
2 cups unsalted butter, softened
1 (8 oz.) package cream cheese, softened
2 cups sugar
2 egg yolks
1-1/2 teaspoon vanilla extract
4-1/2 cups all-purpose flour
Buttercream Frosting:
3-1/2 cups confectioners' sugar, divided
4 tablespoons butter, softened
1/2 teaspoon vanilla extract
3 to 4 tablespoons milk, divided
food coloring, optional


Sorry, I forgot to take a pictures of the steps for the frosting.
For frosting, combine 1-1/2 cups sugar, butter, vanilla and 3 tablespoons milk in the bowl of an electric mixer; beat until smooth. Gradually add remaining sugar; beat until light and fluffy, about 3 minutes. Add enough remaining milk and food coloring (if using) until frosting reaches desired consistency. Frost and decorate cookies.


Wednesday, December 18, 2013
Cooking for Yuletide-Part One: Pecan Tattletales
So today I began my cooking frenzy for our Yuletide feast. The 25-pound ham is defrosting and I've started making cookies. I'm making three types of cookies, one candy, a cake and a pie. That should do it for sweets.
Today, I made my personal family favorite, simply known as Pecan Balls. I posted it last year but, since I make them every year, here it is again.
One of my friends renamed them as Tattletales and it's a good name. It's obvious to everyone when you eat one, as the powdered sugar always manages to land right on you shirt. LOL
 Tattletales aka Pecan Balls
4 cups Flour
1 pound Butter
1-1/2 teaspoon Vanilla
1/2 cup Sugar
2 cups Pecans
Powdered Sugar
Heat oven to 350 degrees. Chop pecans fine and set aside.
Cream sugar and softened butter.
 Add vanilla.
Slowly add flour, one cup at a time. Add nuts.

Make into 2-inch balls.

Bake until light golden brown. Let cool slightly.

Roll in powdered sugar and devour!

One tip: For extra flakiness, refrigerate the cookies after you make them into balls.
You can make different flavors too. Substitute almonds for the pecans and almond extract for the vanilla. Bake as normal but don't roll in powdered sugar. Let cookies cool then drizzle with melted milk or dark chocolate, then drizzle with melted cherry flavored chips if you can find them. Delicious. Use walnuts and maple flavoring. Substitute mini chocolate chips for some or all of the nuts. I've also used toasted coconut and dipped them in white chocolate. Use your imagination.
Today, I made my personal family favorite, simply known as Pecan Balls. I posted it last year but, since I make them every year, here it is again.
One of my friends renamed them as Tattletales and it's a good name. It's obvious to everyone when you eat one, as the powdered sugar always manages to land right on you shirt. LOL

4 cups Flour
1 pound Butter
1-1/2 teaspoon Vanilla
1/2 cup Sugar
2 cups Pecans
Powdered Sugar
Heat oven to 350 degrees. Chop pecans fine and set aside.
Cream sugar and softened butter.

Slowly add flour, one cup at a time. Add nuts.

Make into 2-inch balls.

Bake until light golden brown. Let cool slightly.

Roll in powdered sugar and devour!

One tip: For extra flakiness, refrigerate the cookies after you make them into balls.
You can make different flavors too. Substitute almonds for the pecans and almond extract for the vanilla. Bake as normal but don't roll in powdered sugar. Let cookies cool then drizzle with melted milk or dark chocolate, then drizzle with melted cherry flavored chips if you can find them. Delicious. Use walnuts and maple flavoring. Substitute mini chocolate chips for some or all of the nuts. I've also used toasted coconut and dipped them in white chocolate. Use your imagination.
Monday, December 16, 2013
Mexican Amore & Guisado Rojo (Red Chili Pork)
I've mentioned in the past that Hubs and I do love us some Mexican food. I don't think love is too strong a word. We eat some sort of Mexican meal at least two or three times a week, sometimes more.
I am fortunate to have a good friend who is from Mexico and who's family owns several restaurants in my area. As a matter of fact, he is now a friend because of those restaurants. It's a real Latin romance story!
Several years ago, my best bud and I went to our favorite Mexican spot to eat. Unfortunately, that night they were closed due to a water main breaking. We were bummed. We were desperate for some of their delicious food. To our good fortune, they told they owned two more restaurants and one was fairly close. So off we went to Moore, OK, for our chips, salsa, and my personal favorite, Chili Rellenos!
We finally find the place, get seated, and out comes a handsome smiling muchacho, bearing chips and Dos Equis. When I tell you this, I really mean it. I saw the sparks fly between my friend and this handsome man. Their fingers briefly touched, their eyes met, and BAM! That was it. Amore!
I'm happy to report that one wedding, seven children (she has 4, he has 3), and 10 years later, these two are still as much in love as they were that magic evening. Just try to tell me love at first sight isn't true! I know better!
Anyway, our friends have passed on some of their delicious recipes and this is one of my Hubs' favorites. You can also make it with chicken or beef but we like pork best. If you like food really spicy, add more of the Japanese Chili Pods. And yes, I had all these hanging around my pantry. We use a ton of chilis in cooking as I make a lot of ethnic dishes.
A trick for tomatillos. As you know, they have a sticky husk which can be somewhat difficult to get off. Freeze the tomatillos first and the husks will pull right off. Easy peasy!
 Guisado Rojo
1-1/2 lbs. Country-style Pork Ribs (you can use any kind of pork but this is best)
1/2 Onion, chopped
3 tomatillos
1 large Tomato or 2-3 small Roma tomatoes
1 Jalapeno (I didn't have one so I used 8 pickled jalapeno rings)
4-5 Dried Large Chili Peppers (I used Pasilla/Ancho Chilis, California Chilis, & Mulato Chili Pods)
2-3 Small Dried Chili Peppers (Japanese Chili Pods, those little hot ones)
2 cloves Garlic
1 teaspoon Cumin, ground
1/4 teaspoon Clove
1 teaspoon Sea Salt
1 teaspoon Black Pepper, ground
1-2 tablespoons Oil (I tend to use Olive Oil but use whatever you have)
 Cut the tops off of the chilis and take out all the seeds.
Place in a saucepan and cover with water.
Bring to a boil and cook until soft.
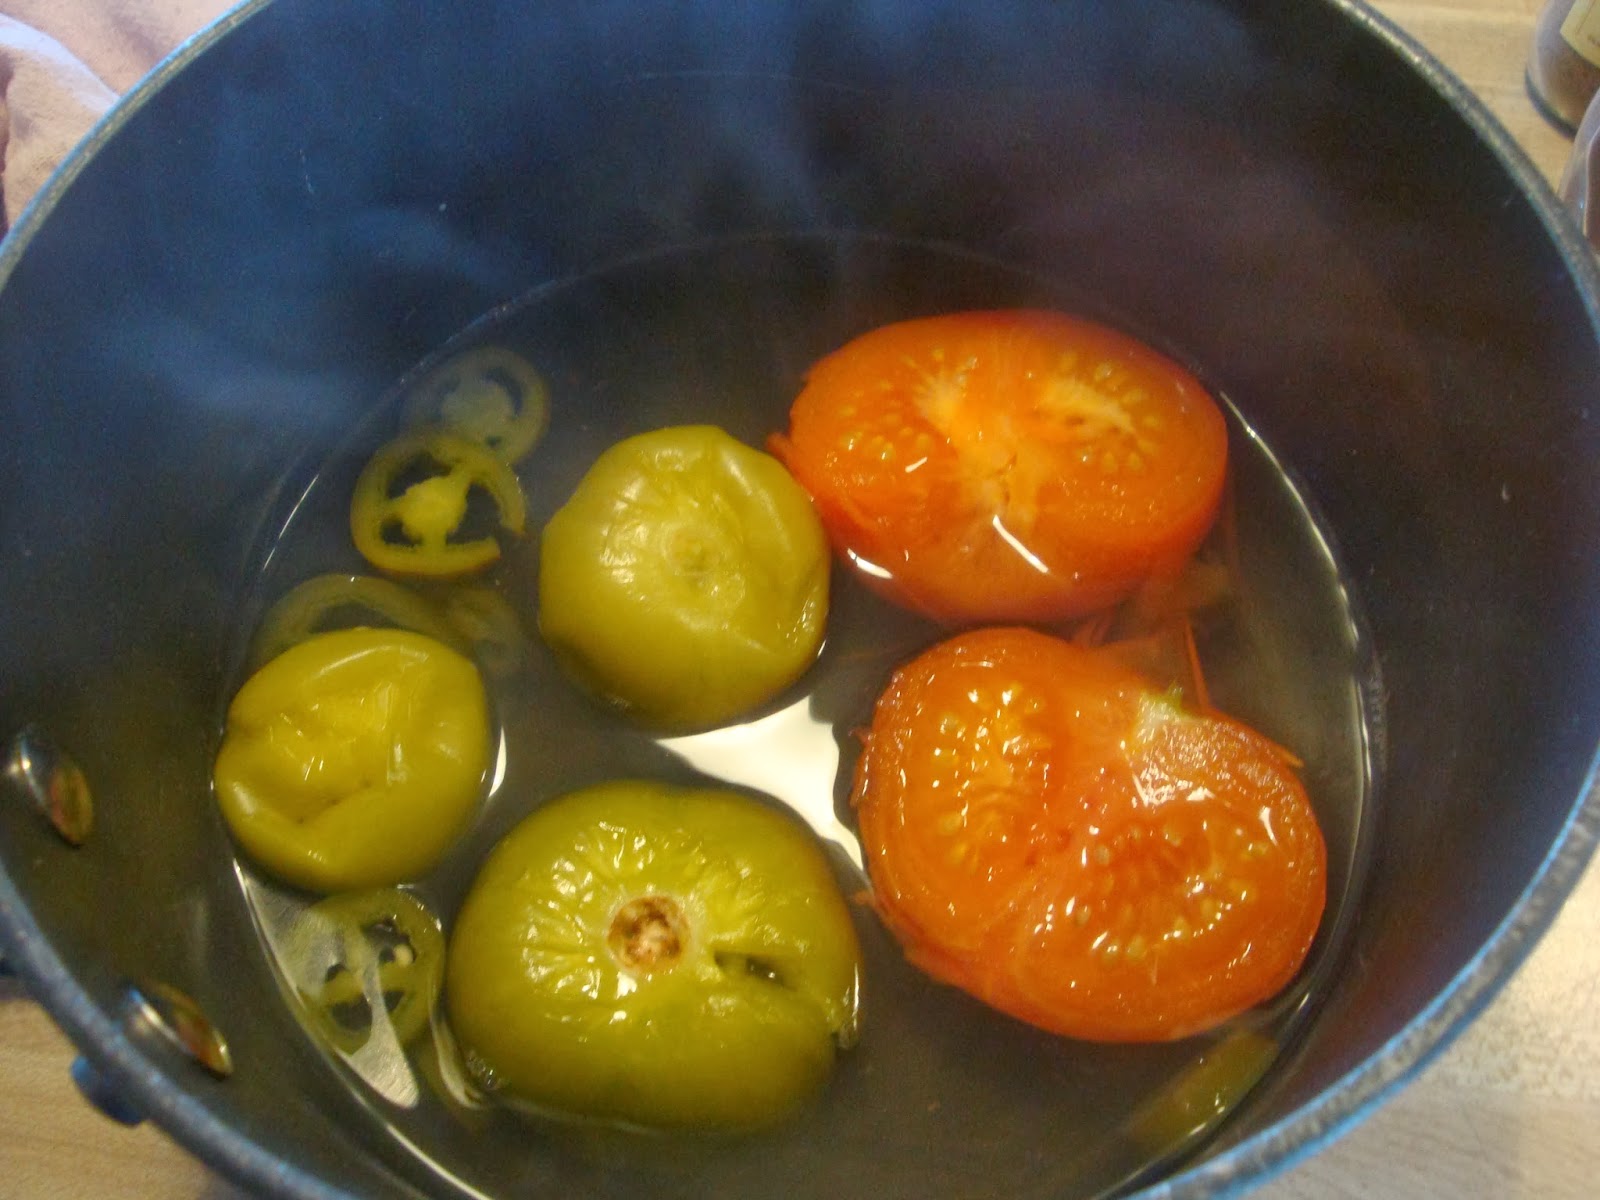
 In another saucepan, put the tomatillos, tomato, and jalapeno.
Cover with water and boil until all are soft.
Watch water levels in both pans and add water as needed until veggies are soft.
 While this boils, cut pork into similar size cubes.
 Brown in oil.
 Add onions and cook until onions are translucent. Keep warm.
 Add soft chilis to the tomatillo mixture.
 Add garlic, cumin, salt, pepper and clove.
 Blend until smooth using a blender or hand blender.
 Pour this over the pork and onion.
 Bring to a boil and then simmer until pork is tender and sauce has thickened.
 Serve with Mexican rice, pico de gallo, and warm corn tortillas.
 Sour cream, grated cheese, chopped onions, tomatoes, lime, shredded lettuce and cilantro can also be sprinkled on as desired. Eat as a taco or mix with the rice. Either way is delish!
I am fortunate to have a good friend who is from Mexico and who's family owns several restaurants in my area. As a matter of fact, he is now a friend because of those restaurants. It's a real Latin romance story!
Several years ago, my best bud and I went to our favorite Mexican spot to eat. Unfortunately, that night they were closed due to a water main breaking. We were bummed. We were desperate for some of their delicious food. To our good fortune, they told they owned two more restaurants and one was fairly close. So off we went to Moore, OK, for our chips, salsa, and my personal favorite, Chili Rellenos!
We finally find the place, get seated, and out comes a handsome smiling muchacho, bearing chips and Dos Equis. When I tell you this, I really mean it. I saw the sparks fly between my friend and this handsome man. Their fingers briefly touched, their eyes met, and BAM! That was it. Amore!
I'm happy to report that one wedding, seven children (she has 4, he has 3), and 10 years later, these two are still as much in love as they were that magic evening. Just try to tell me love at first sight isn't true! I know better!
Anyway, our friends have passed on some of their delicious recipes and this is one of my Hubs' favorites. You can also make it with chicken or beef but we like pork best. If you like food really spicy, add more of the Japanese Chili Pods. And yes, I had all these hanging around my pantry. We use a ton of chilis in cooking as I make a lot of ethnic dishes.
A trick for tomatillos. As you know, they have a sticky husk which can be somewhat difficult to get off. Freeze the tomatillos first and the husks will pull right off. Easy peasy!

1-1/2 lbs. Country-style Pork Ribs (you can use any kind of pork but this is best)
1/2 Onion, chopped
3 tomatillos
1 large Tomato or 2-3 small Roma tomatoes
1 Jalapeno (I didn't have one so I used 8 pickled jalapeno rings)
4-5 Dried Large Chili Peppers (I used Pasilla/Ancho Chilis, California Chilis, & Mulato Chili Pods)
2-3 Small Dried Chili Peppers (Japanese Chili Pods, those little hot ones)
2 cloves Garlic
1 teaspoon Cumin, ground
1/4 teaspoon Clove
1 teaspoon Sea Salt
1 teaspoon Black Pepper, ground
1-2 tablespoons Oil (I tend to use Olive Oil but use whatever you have)

Place in a saucepan and cover with water.
Bring to a boil and cook until soft.
Cover with water and boil until all are soft.
Watch water levels in both pans and add water as needed until veggies are soft.


Subscribe to:
Posts (Atom)